
Please carefully follow this Quick Start Guide to ensure a hassle-free startup process and to keep your Orbital PC running at peak performance for many years to come. It should only take 5-10 minutes to read from start to finish and will contain critical information – including some information that may even come as a surprise to IT pros!
If you have any questions, please email us at support@orbitalcomputers.com and include your Orbital Computers Serial Number (on top of desktops and on the underside of laptops). Feel free to attach pictures to your support email – they can be real helpful!
Email is the preferred method of contact for support requests.
IMPORTANT – Since every Orbital Computer is custom built with literally millions of possible configurations, the pictures shown below may not match your PC 100%. These instructions are as generalized as possible and should cover most configurations, but if you have a unique setup or need further clarification, please email us and include pictures where helpful.
1. Verify Cable/Monitor Compatibility: Before your new PC arrives, click this link to determine the correct cables to hook your PC up to your monitors.
This is one step you don’t want to skip – it’s no fun to find out you have to wait for new video cables to arrive when you’re setting up your new PC! Click here.
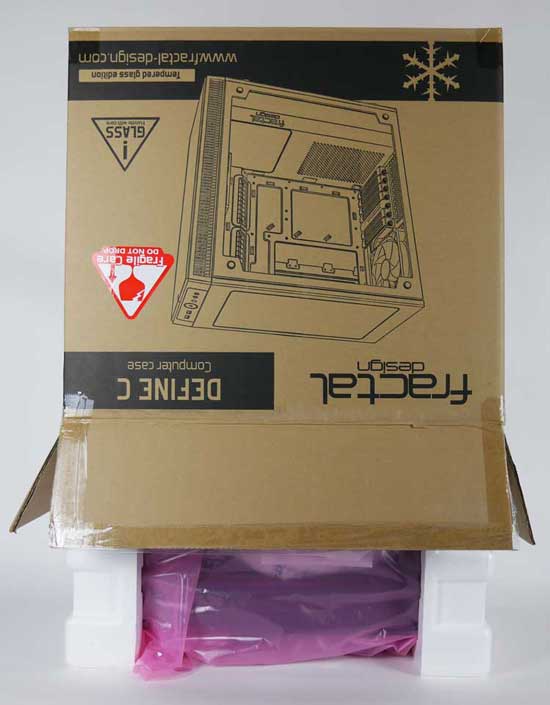
2. Unbox the PC:
IMPORTANT – Save ALL of your packing materials! Including both boxes, all foam, the internal insta-pak foam (if included), and pink anti-static bag. This is super important in case you have to send the PC back for upgrades or repairs. You can break the cardboard boxes down and store them flat to save space.

- Cut the outer shipping box open and remove the internal PC box.
- Cut open the top of the PC box and then carefully flip the box over and slide the box off the top of the PC.
- Remove foam blocks and pink anti-static bag and save all packing materials in a safe place.
- If you notice any damage or hear things rattling around inside the case, please email us with pictures right away.
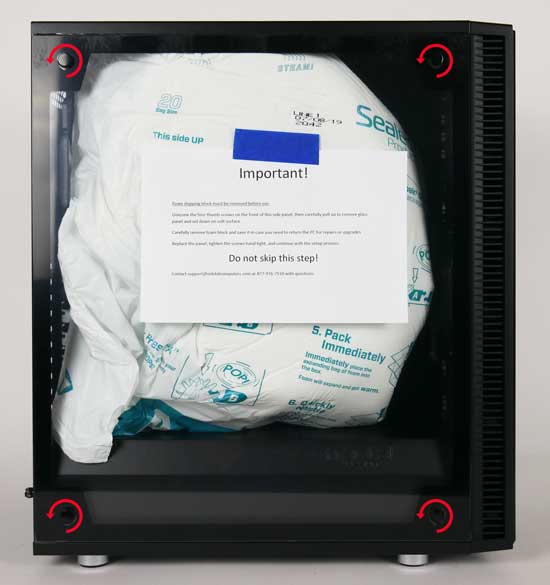
IMPORTANT – Some PCs will come with a notice taped to the side panel indicating that you must remove an internal foam shipping block from the inside of the PC. This step only applies if you see the following notice taped to your case. Only certain configurations will include an internal foam shipping block that must be removed before use. We use this internal insta-pak foam if you have a configuration with bulky internal components that could potentially get damaged in transit. If you ordered a larger CPU cooler, the fans may have a large zip tie providing additional support in transit – you can either leave the zip-tie in place or cut it if you prefer. If you don’t mind the aesthetics, we would recommend leaving it in place.
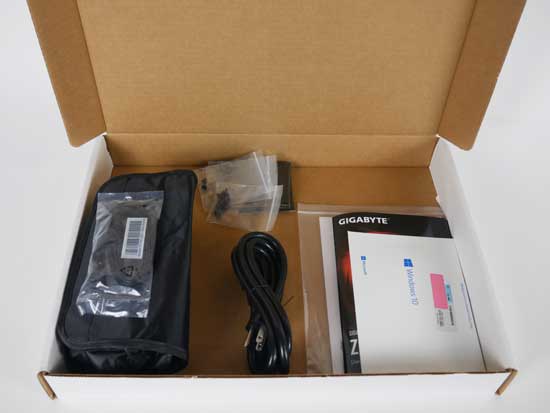
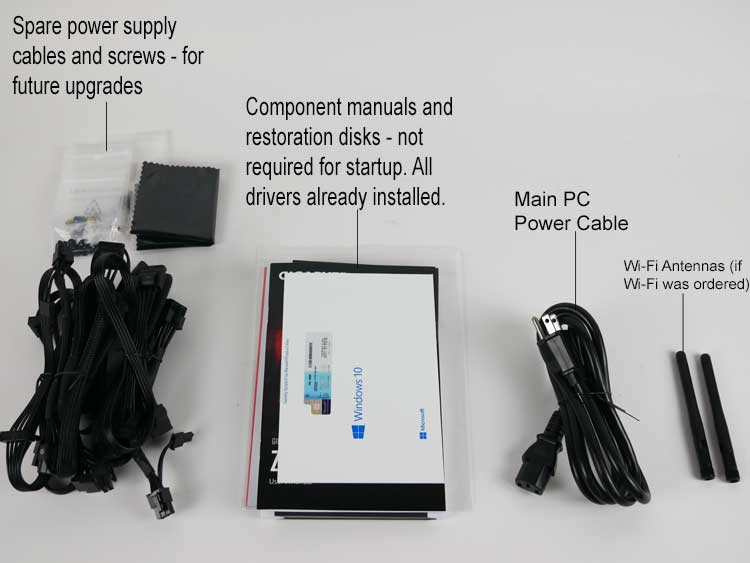
Spare Parts Box Contents:
You’ll find a spare parts box inside the package. This box will contain some items that are required for startup (like the power cable and Wi-Fi antennas if applicable) and will also include a bunch of spare parts that you need in the future if you want to upgrade the system with additional hard drives, video cards, etc. We may also include some driver CDs. All software from those CDs will already be installed on the PC but they can be used to restore the PC if required (all the drivers and Windows itself is now available as a digital download online – email us for help if you ever have to reinstall Windows, there are more efficient ways of reinstalling without using CDs).
3. Location for your PC:
The PC is configured to draw air in the from the underside of the case. The PC must not be placed directly on carpet. Putting the PC directly on carpet will generate static and starve the system of proper airflow, causing damage.
Do not place the PC directly on carpet.
You can put the PC on wood, on your desk, on a piece of metal or on a small computer cart like this.
Provide at least 1 inch of clearance on all sides of the case to ensure proper airflow.
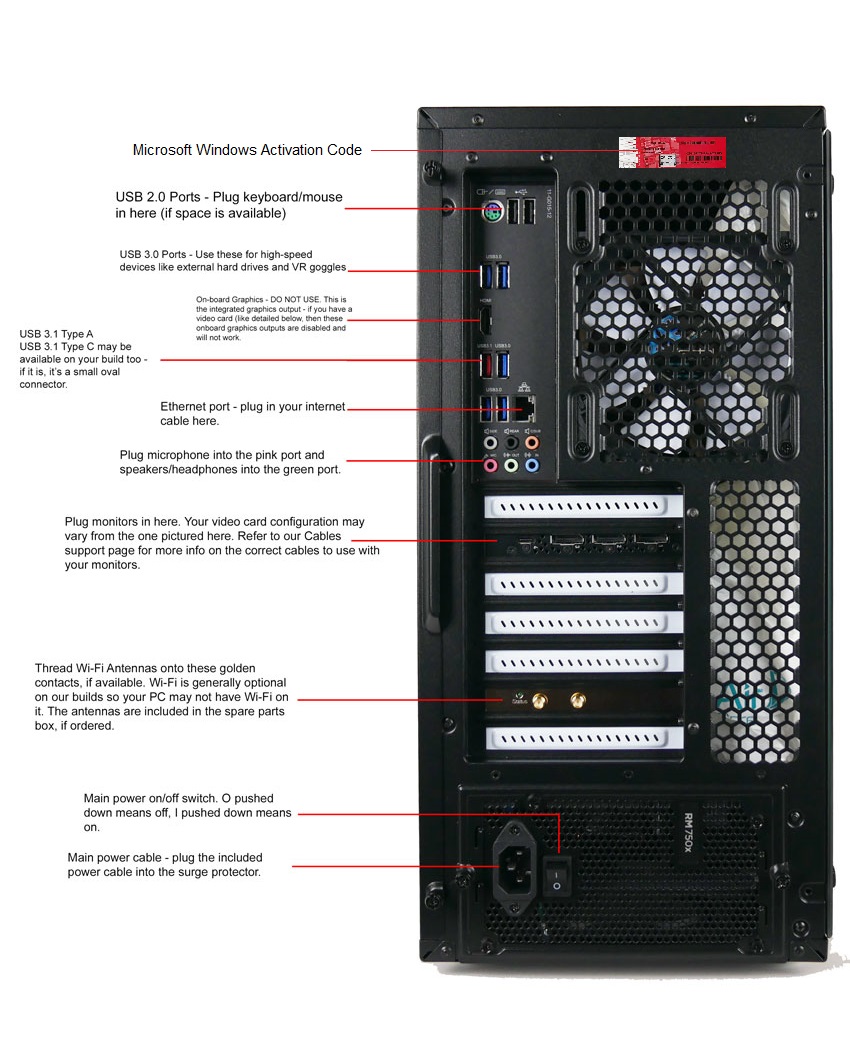
4. Plug in Peripherals:
- Refer to the image below to plug in your peripherals including monitors, keyboard/mouse, ethernet cable, speakers/mic, USB devices, Wi-Fi antennas, etc.
Your configuration may differ from that shown below, but in general, these items all go in similar locations. - Regarding USB Ports: You may have a combination of USB 2.0, USB 3.0, USB 3.1 Type A and USB 3.1 Type C ports on your PC.
USB 3.0 and 3.1 are the newest and fastest. They are best reserved for USB devices that can make full use of all that speed – items like flash drives, external storage devices, VR goggles, and any other USB 3.0/3.1 specific devices.
USB 2.0 ports are ideal for your keyboard, mouse, printer, and any other lower bandwidth USB devices. USB 2.0, 3.0, and 3.1 Type A are all inter-compatible, however, a USB 3.0 hard drive will only run at USB 2.0 speeds if you plug it into a 2.0 port. - Use ethernet instead of Wi-Fi if possible. Ethernet will provide a more reliable and lower latency connection.
- If you are going to plug in speakers and/or a microphone, do so after completing the initial Windows startup process for the smoothest setup process.
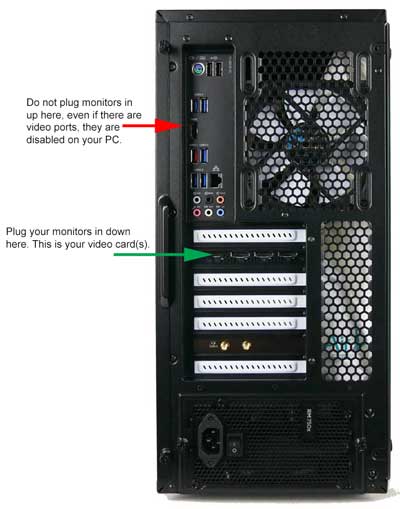
5. Connect Monitors:
- Connect your monitors to the back of the PC using the cables as described in the cable guide here.
- Connect your monitor power cables to the surge protector/power strip.
- Power on the monitors by pressing the power button on the outside of the monitor bezel.
- If you are using multiple monitors, the order you plug the video cables is not important at this point – once we get into Windows, we can tell the PC where the monitors are located in relation to each other.
- If you have multiple monitors, you’ll need to use the Display Settings feature within Windows to tell the computer where each monitor is located in space. Please watch this brief video guide showing how to arrange your monitors.
IMPORTANT – Make sure your video cables/monitor cables are plugged into your video card – NOT the motherboard/on-board graphics. This is extremely important.
6. Prepare for Power.
- In order to be covered under warranty, you must use a surge protector. An inexpensive power strip with surge protection built in will work just fine, though you may want to consider a higher performance UPS/battery backup device. We’ve had great experience with the APC UPS BX1500M device which is available online.
- Make sure the power supply on/off switch is switched off – (“O” pushed down).
- Connect power strip to wall, then plug the main PC Power cable into the back of the PC and into the power strip.
- Turn on the power strip, then flip on the PC main power switch – (“I” pushed down).
- Press main power button on top/front of PC to start the computer.
7. Windows Setup:
- We have already installed Windows and all your hardware drivers for you. You’ll be asked to choose a user name and some personal configuration specifics (like timezone, password, keyboard preferences, etc). Carefully read the questions and click through the prompts as appropriate.
- Windows has already been activated – your product code is on a sticker on the back of your PC (for future reference).
- For best performance, install programs with the 64-bit version if given the option between 64-bit and 32-bit.
- As a general guide, don’t use Sleep or Hibernate modes. If you’re leaving the PC unattended for <48 Hours, ‘Lock’ the PC (press the Windows key and L on the keyboard at the same time). If leaving the PC unattended for >48 hours, click Start and click Shut Down to turn off the PC.
8. Some brief security notes:
- Never move the computer or touch any internal components while it is powered up.
- Never open attachments sent from unrecognized e-mail addresses. Be extra suspicious of unsolicited files ending in ‘.exe’, ‘.zip’, ‘.pdf’, or ‘.rar’.
- If you receive a call from a company warning you about viruses or issues on your PC, hang up. This is a common scam. Do not allow any company unsolicited remote access to your PC.
- It’s a good idea to keep a backup of your data at all times. this can be as simple as buying a large external hard drive and setting Windows to run a daily automated backup to the hard drive. The gold standard would be to keep one copy of your most important data offline and offsite.
- When installing new software on your PC, always check the box in the installer labeled ‘advanced installation’ or ‘custom installation’ and never select the quick install option. The advanced installation option is not more difficult, it simply allows you to opt out of spammy adware/bloatware that is bundled with free software. Make sure that the only box left checked is the program you intended to download. Carefully read all program installers before continuing through them as they will frequently try to sneak in adware.